So you just bought a Samsung SSD. Now what? How in the world you’re going to migrate your Windows 10 OS along with all your programs and files to the new SSD? While you could just bite the bullet and re-install everything from scratch, doing so can be extremely time consuming.
Luckily, one of the features that sets Samsung SSDs apart is the Samsung’s Data Migration Software which can make the migration process from your old HDD or SSD to your new one easy and pain free. Today we’ll show you how to use it.
Step 1
Connect your new Samsung SSD to your PC. There are a few ways to do this.
Step 2
Download Samsung’s Data Migration Software. Once downloaded, extracted and installed, start up the software.
For the purposes of today’s guide, we’ll be showing you how to use the latest version of Samsung Data Migration Tool Version 3.1. The Samsung Data Migration Software supports Windows XP SP2, Vista, 7, 8, 8.1, and 10 along with pretty much every Samsung Consumer SSD on the market.
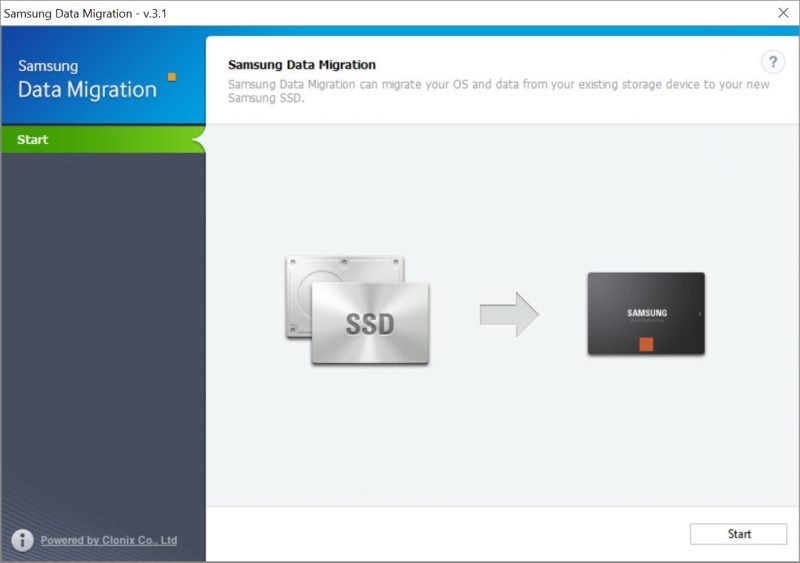
Once started, you’ll be greeted with the screen below. Go ahead and click the Start button in the bottom right hand corner of the app to get started.
Step 3
Next you’ll see the Disk Analysis and Cloning menu. In our instance, we’re migrating from a small Kingston V300 120GB to a Samsung 850 EVO 500GB. We can see both drives below. Ensure that the drive you’re migrating from is under Source Disk and the new Samsung drive under Target Disk. Click on Start to begin the migration process.
Step 4
Once the process is started, simply wait until the migration process is completed.
Step 5
When the migration is complete, the utility will display “The data on the Source Disk has been successfully cloned to your Samsung SSD.” From here simply turn off your PC, disconnect the old SSD and connect the new SSD if you haven’t done so already. That’s it!
This post was last modified on February 16, 2020 5:50 pm
Whether you're a CrossFit enthusiast, a rucking adventurer, a high-intensity interval training (HIIT) devotee, or…
Introduction Credit scores are a crucial part of our financial lives, yet many people don't…
Earlier this week, T-Mobile and SpaceX jointly shared that they would be making an announcement…
Starlink Satellite Dish | Source: SpaceX In a recent Tweet sent out by SpaceX, wireless…
With the release of Tesla FSD (Full Self Driving) 10.69 Beta starting to roll out…
Tesla Powerwall Last year, Tesla launched a pilot of their VPP (Virtual Power Plant) where…
This website uses cookies.
